The term “Customisation” is a process of adding new or altering existing features in order to make it a better fit for the needs of each business. There are various levels of customisation in Dynamics 365. This blog will cover some of the basic levels of customisations that can be performed within the user interface of the CRM which does not require a lot of technical expertise.
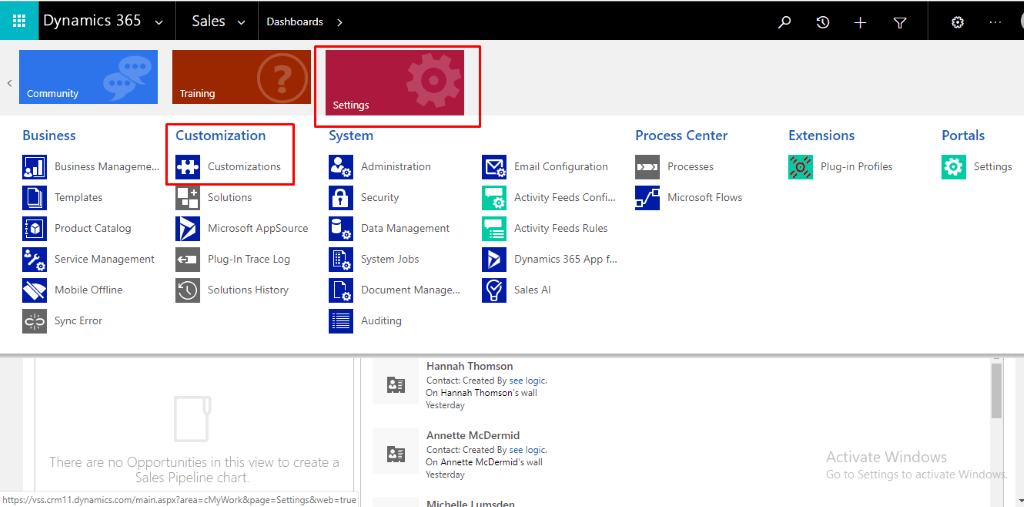
- Navigate to the “Setting” area and click on “Customisation”
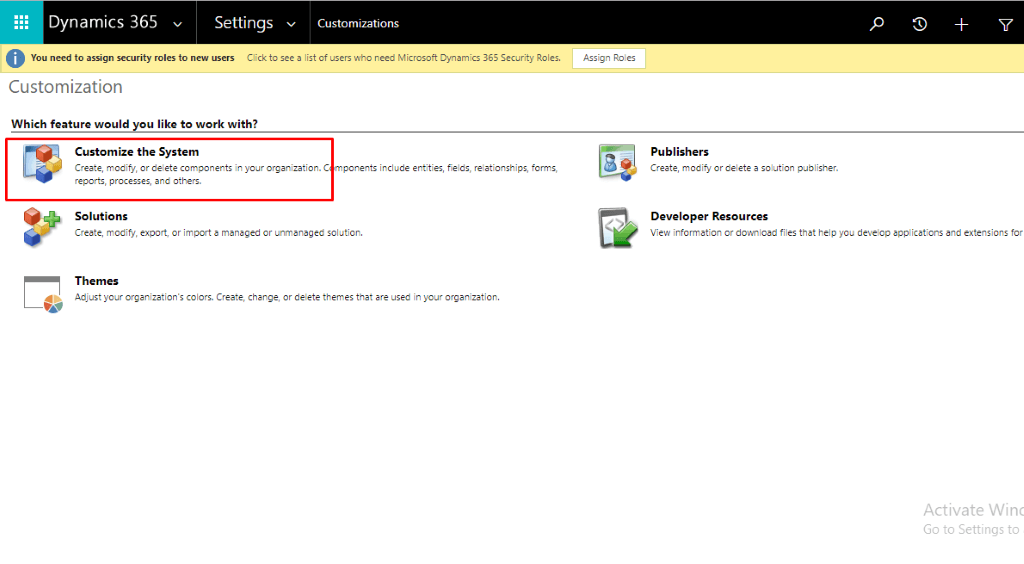
- Click on “Customise the system”
1. General settings of an entity:
Steps:
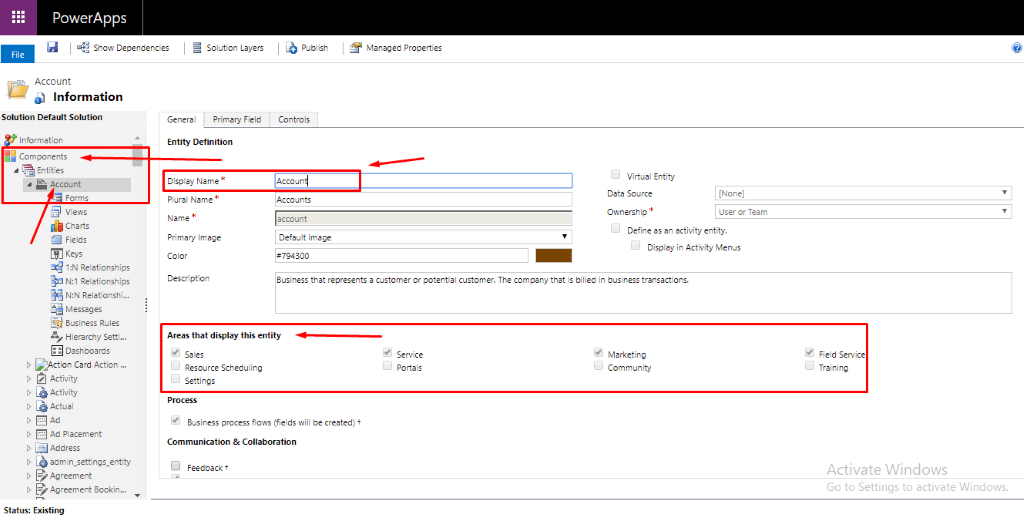
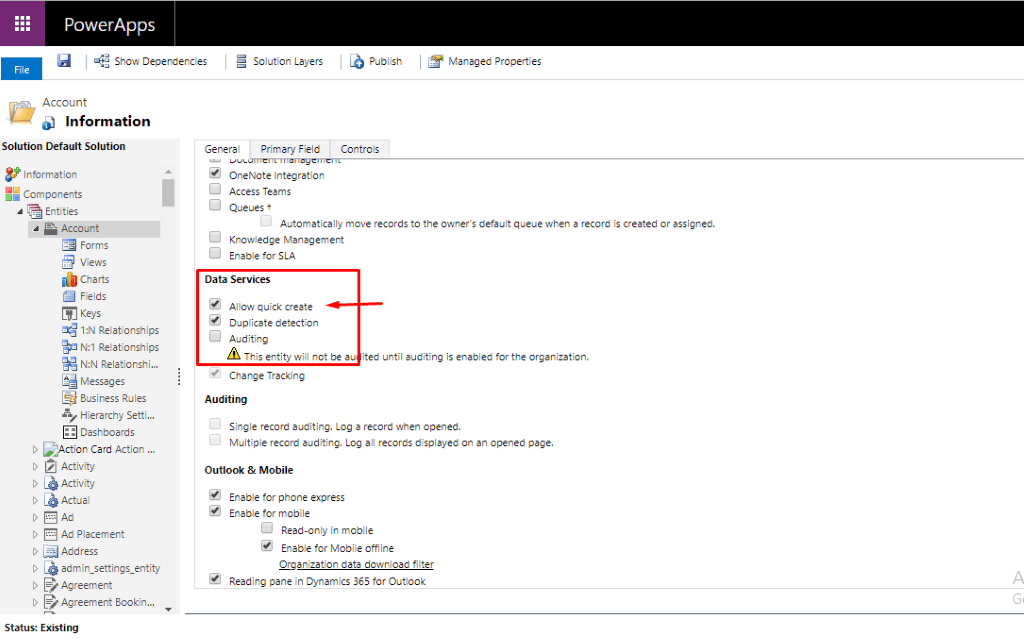
- Expand the entities and choose any entity that you want to customise. Here you can change the display name, display the entity on different business applications, allow quick creation, auditing and many other settings as shown in the following images.
- Select areas in “Areas to display the entity” to display the entities in different areas such as sales, service, marketing, and other areas.
- Click on “Save” and “Publish” at the top bar.
2. Forms
Forms are made up of data entry fields where the user enters data. You can customise the fields of different entities in the form section of an entity.
Steps:
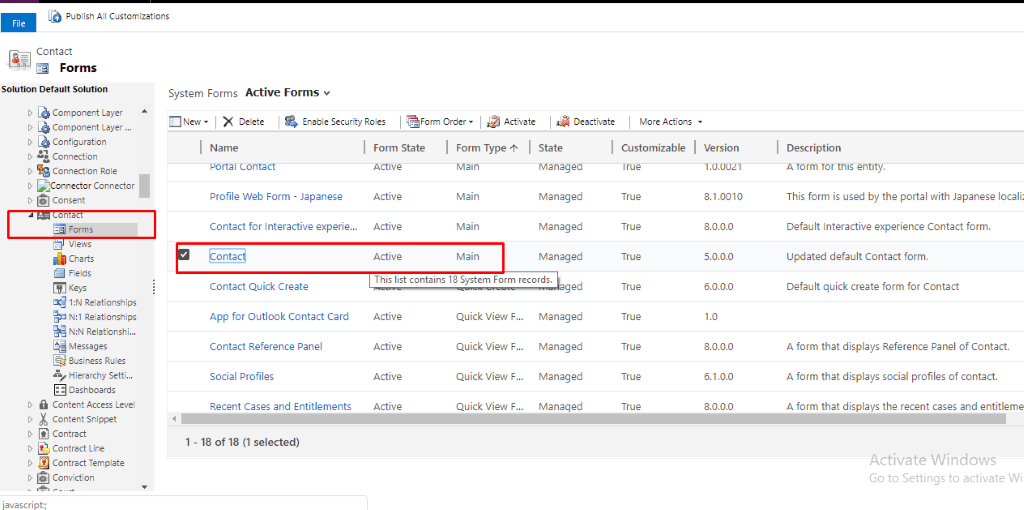
- Click on the “Form” of the “Contact” entity.
- Select the type of form.
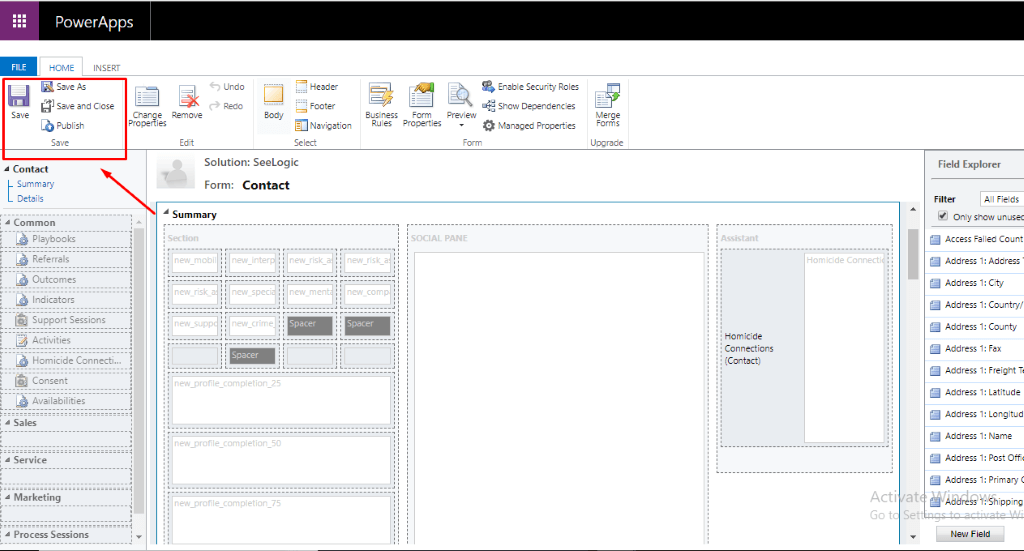
- Select either body, header or footer section of the form to add or remove fields from the form as shown in the following image.
- Drag and drop fields from the right menu at the center.
- Then click on “Save” and “Publish” to publish the customisations.

3. Navigation Pane
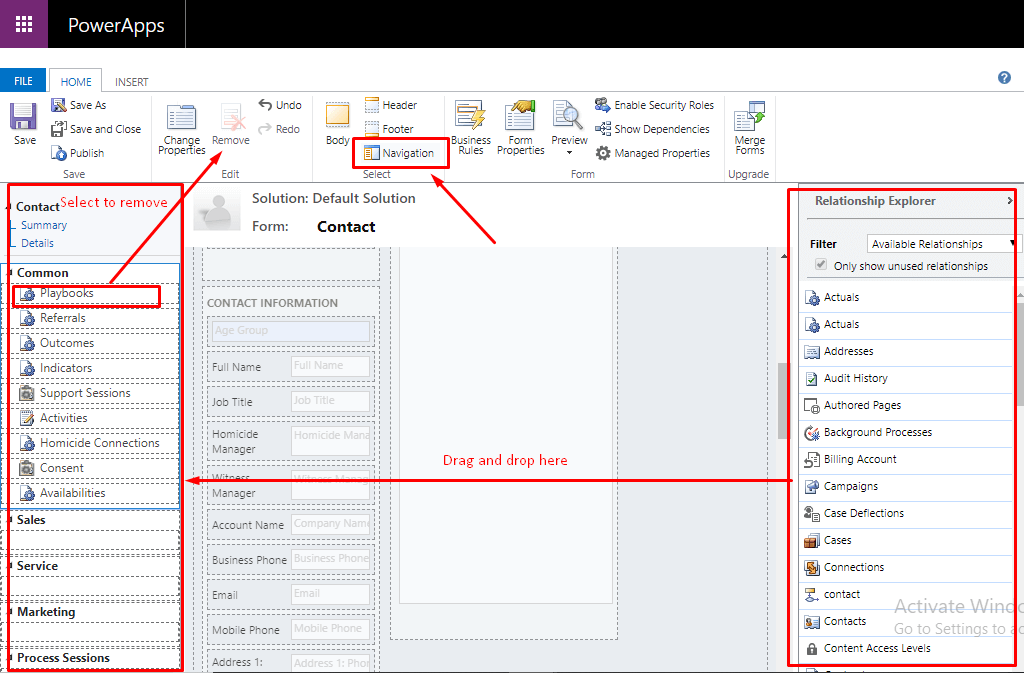
To add or remove related options of the entity in the navigation pane, select options from the right menu and drag it to the left menu to add on the navigation pane. And to remove the option, click on one option and then click on the “Remove” option at the top bar. Then click on save and publish your customisations.
4. Change properties
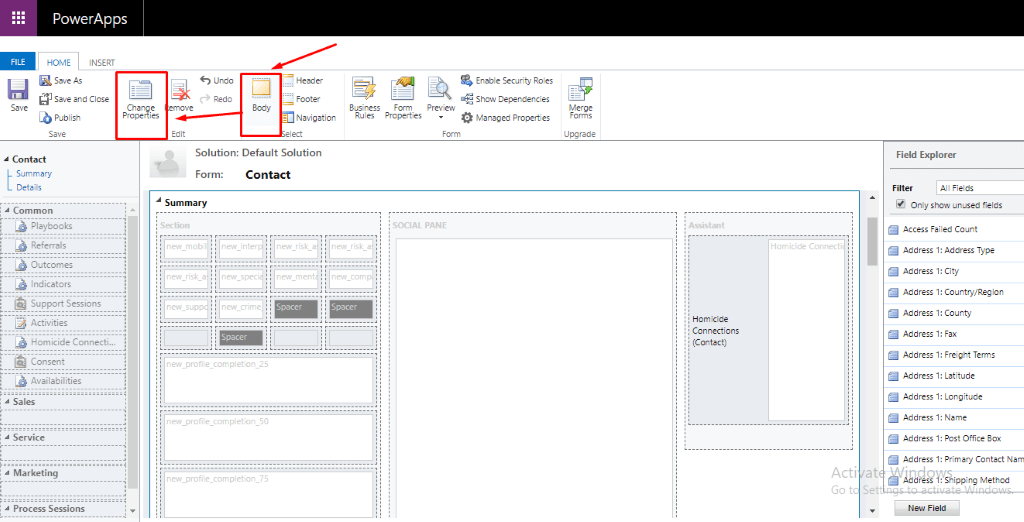
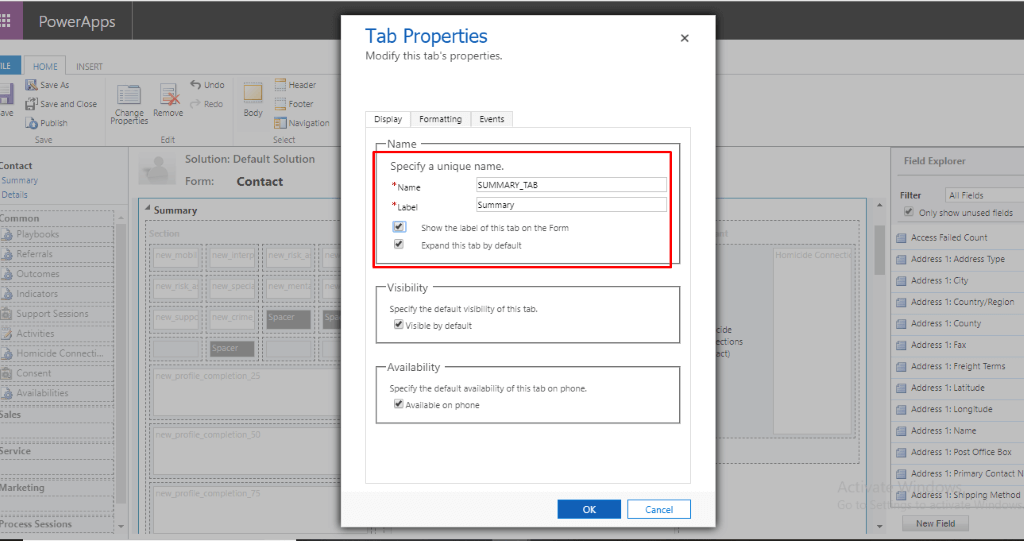
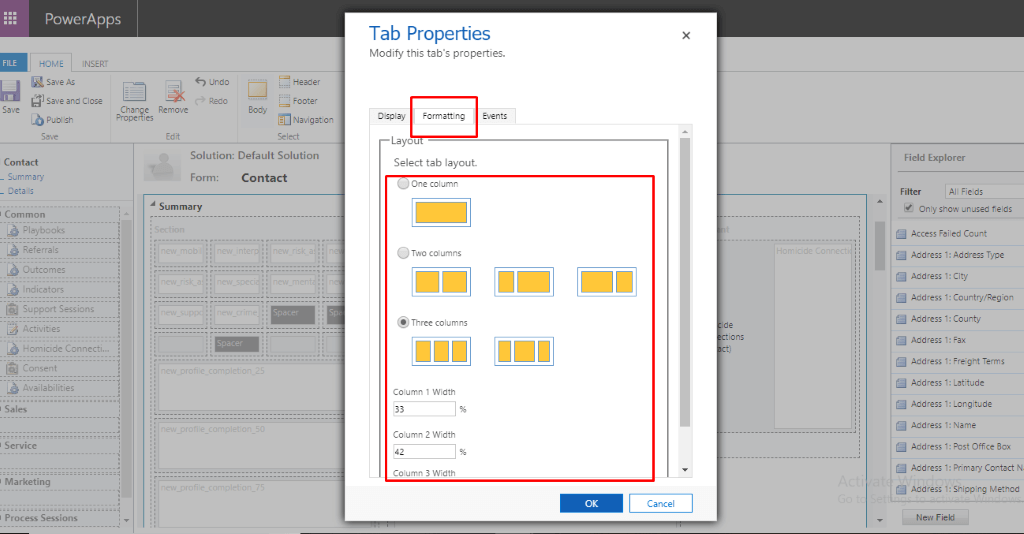
To change the properties of tabs displayed on the form and the layout format of the forms, select the section either body, header or footer and click on “Change Properties”. Make some changes in the “Display” section and choose the layout on the “Formatting” section, click on ok to save it. Then click on “Save” and “Publish” your customisations.
5. Views
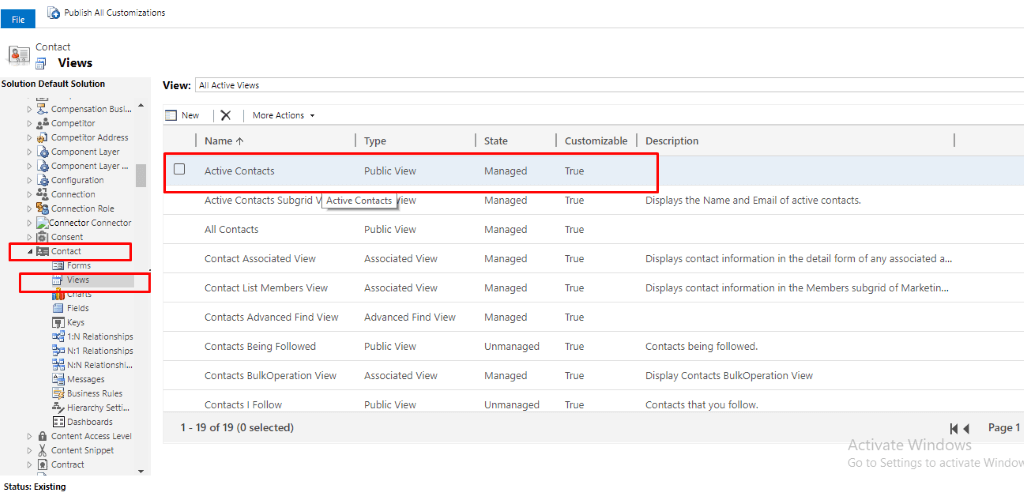
A view is a grid with records listed under select column headings. Users are able to choose views to get a peek into a subset of records of the same entity. The entity must fit into pre-specified filter conditions. You can change the views of different types such as Advanced View, Public View, Associated View, Advanced find view and so on.
Steps:
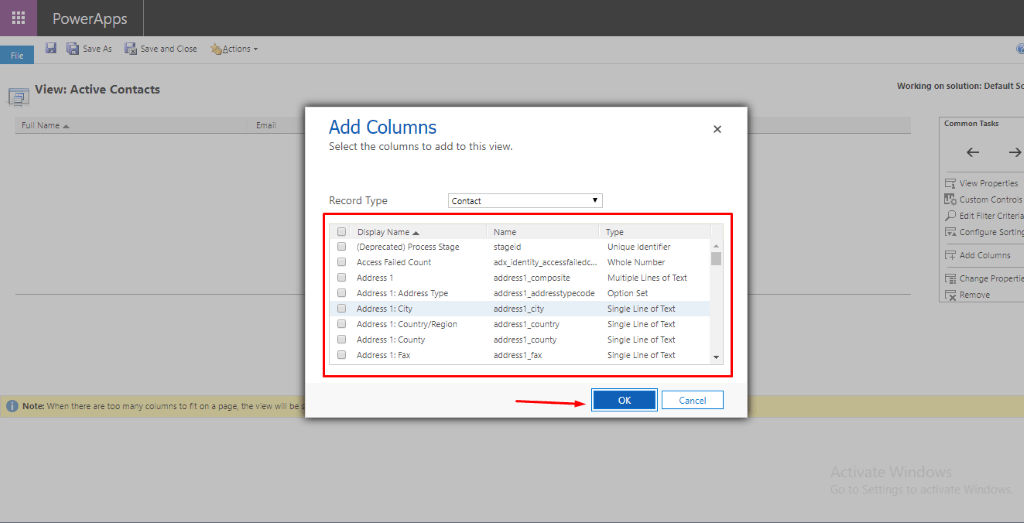
- Select “Views” of an entity that you want to change the views of.
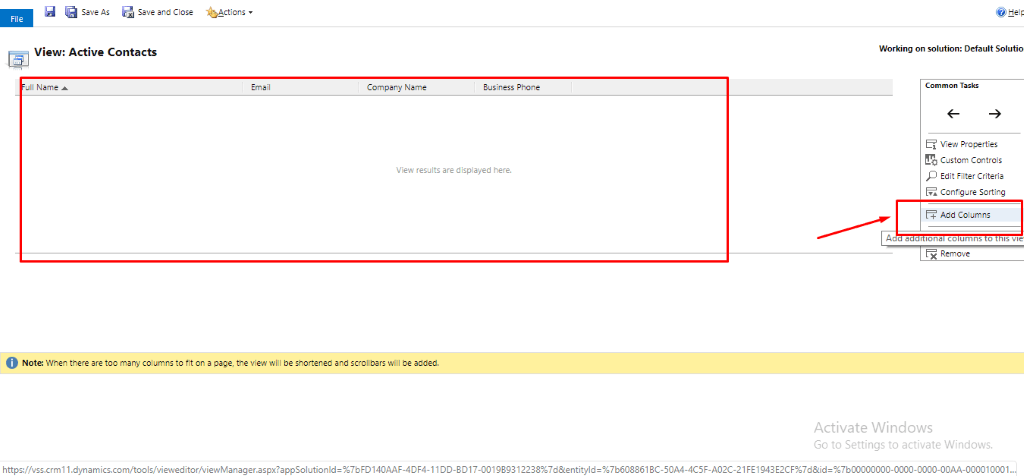
- Choose a view type and then add columns.
- You can sort the order of columns by selecting the column and clicking on the left and right arrow.
- Click on “Save” and “Publish” your customisations.
6. Fields
You can customise the fields having different data types.
Steps:
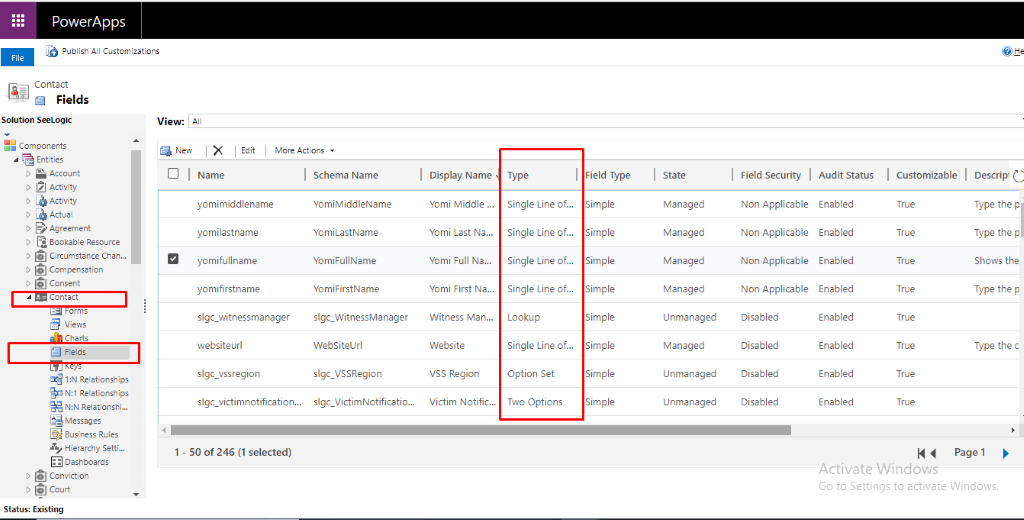
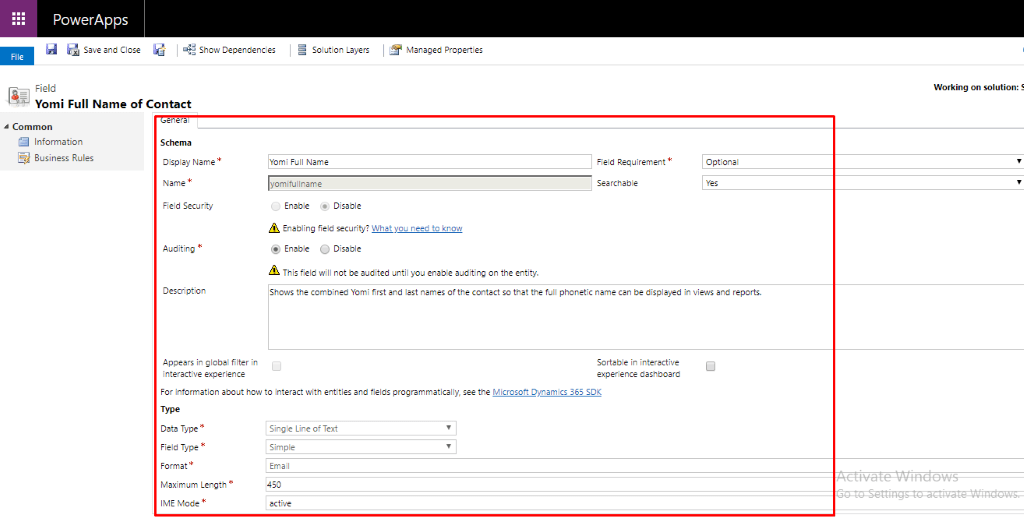
- Select “Fields” of an entity from the left menu, choose the data type and make edits as per your requirement.
- Change the display name, provide the length of the text for that field.
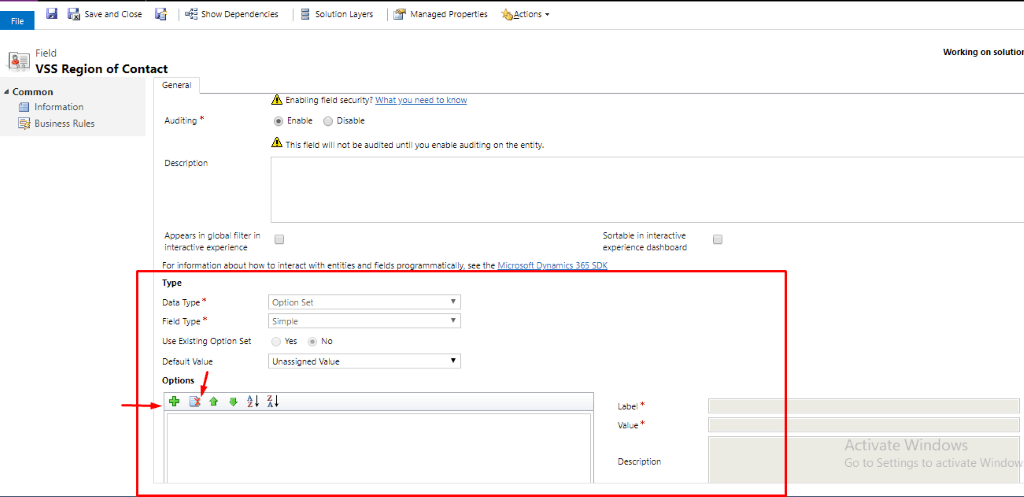
- Create values for option set fields by clicking on the “+” sign as shown in the following image.
- Click on remove option to remove values and sort the order via an up and down arrow.
7. Business Rules
Business rules provide a simple interface to implement and maintain fast-changing and commonly used rules. You can apply them to Main and Quick Create forms.
Steps:
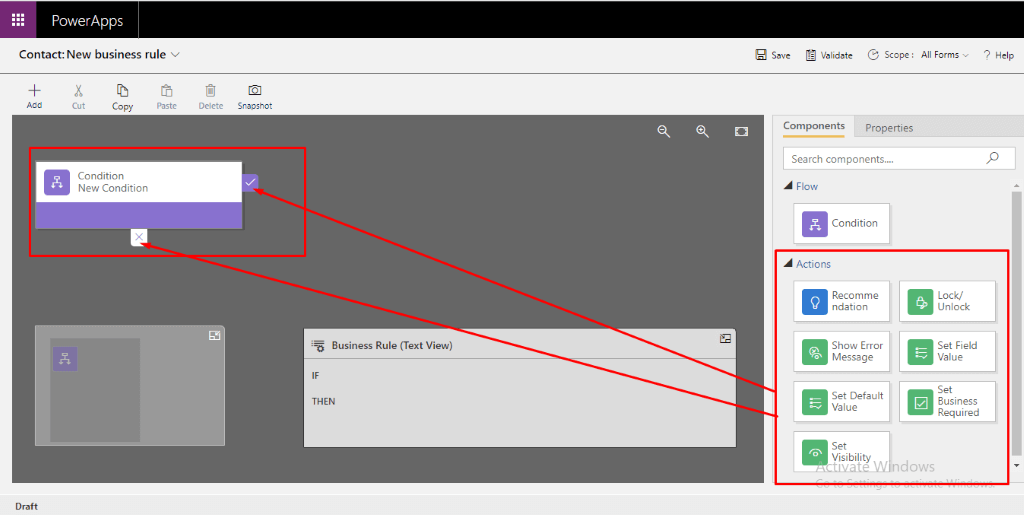
- Select business rules and click on “New”.
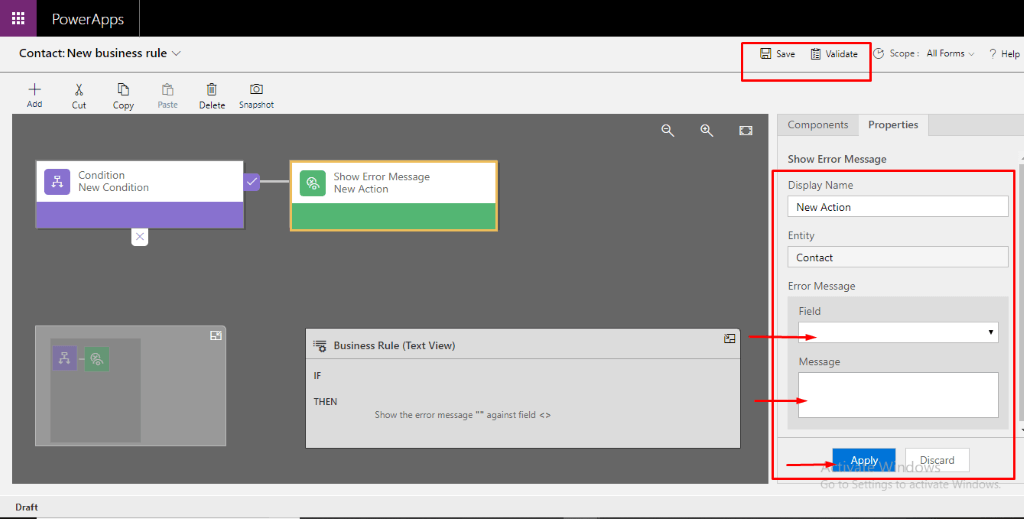
- Choose an action and drag and drop at the “+” sign next to a checkmark if you want the business rule to take that action when the condition is met, or to a plus sign next to an “x” if you want the business rule to take that action if the condition is not met.
- Then click on apply, validate and save it.
8. Relationships
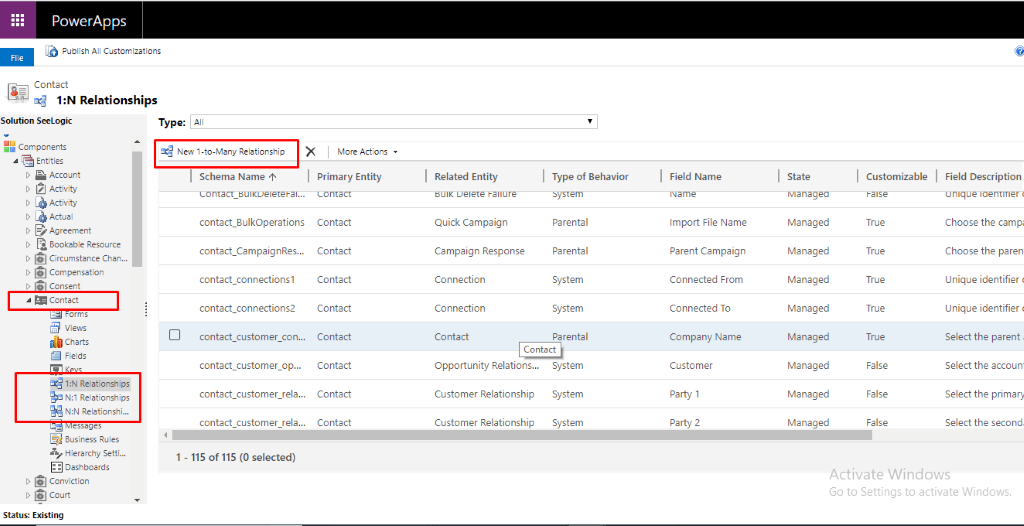
Entity Relationships in Microsoft Dynamics CRM is the ability to relate an entity to itself, which is referred to as self-referential. Microsoft Dynamics CRM supports the following relationships:
- 1: N relationships (one to many)
- N:1 relationship (many to one)
- N: N relationships (many to many)
Steps:
- Choose the kind of relationship from an entity, click on “New”.
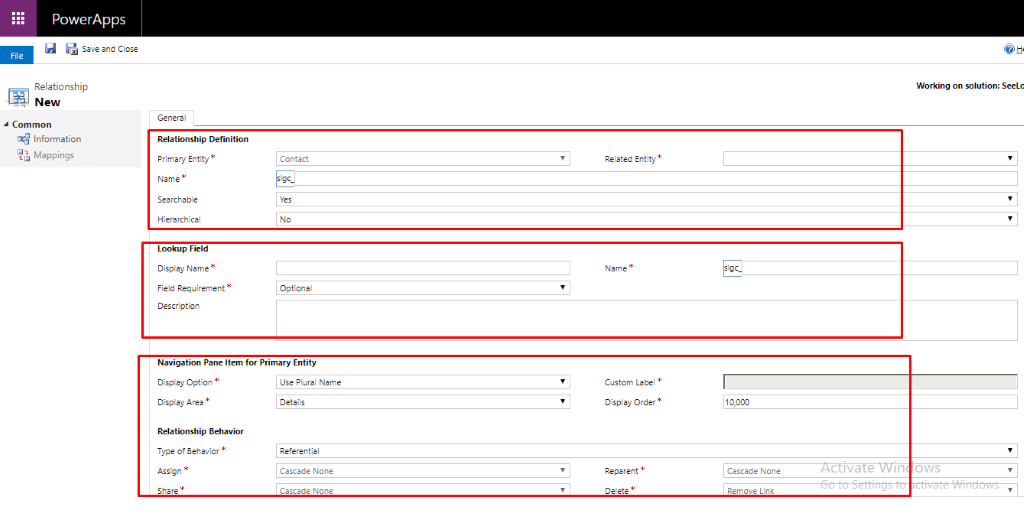
- Select whether it will be searchable to not.
- Assign a value for the “Display Name” field in the Lookup Field section
- Enter all the details in “Relationship Definition”, “Lookup Field Section”, “Navigation Pane Item” for the primary entity and “Relationship Behavior”.
- First, click on the “Save” button and then “Publish” all your customisations.
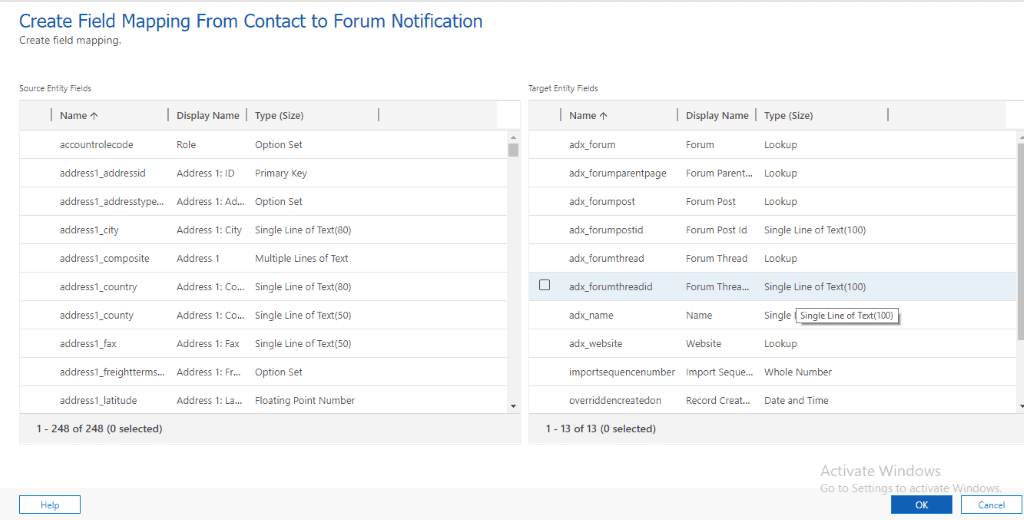
- Now go to “Mapping” and create “New Mapping” between the Source entity and Target entity.
So, this is how you can make basic customisations within CRM.
If you need help implementing D365 in your organisation, contact us today for a no-obligation consultation on 01296 328 689. Or email us at info@dogmagroup.co.uk. Subscribe to our blogs to keep up to date with the latest technology and market trends.
